Agronomist notes
 Hello Reader,
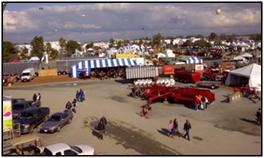
Last week I was a guest of Bayer CropScience and attended the World Ag Expo in Tulare, California. What a great opportunity to check out vacuum planters by Monosem, Case IH, Great Plains and John Deere. We toured the Bayer research facility in Tulare where they do a lot of herbicide testing and also spent a day tasting vineyard ‘products’ in Napa Valley. In a word: enjoyable. This week I’ll be speaking at the Precision Ag 2.0 conference in Calgary. Stop by or email, phone, text, facebook, tweet or send me a message on linkedin if you’re going to be there.
This week we’ll discuss what you should consider when designing your own offset hitch for inter-row seeding for controlled traffic farming. Next, I’ve got a few details on a nitrogen side dress toolbar built for John Deere sprayers. Last, divulge a plan to purchase a sensor system for variable rate on our farm in 2012.
Have a great week.

Designing your own inter-row seeding system
 Planning ahead is key
In 2010 Mitch, Sam and I tried to wrap our heads around a system that would allow us to inter-row seed while remaining on our permanent tram lines. The goal being to keep the tractor and air tank stationary but move the drill side to side each year. With two years under our belt, we’ve successfully developed an offset hitch that can work inside any CTF or random farming system when used in conjunction with RTK guidance.
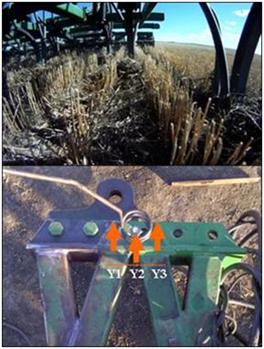
The hitch design you see here is Generation 2, and is extremely overbuilt but gets the job done on our 30-ft Concord drill. The hitch pins can be unbolted and the tongue moved 3 inches from left to centre and also 3 inches from centre to right for a total of 6 inches on our 12-inch row spacing. Many offset hitch designs on 12-inch spacing move the hitch 6 inches left, then 6 inches right the next season. This tends to leave one large and one small guess row between passes when seeding back and forth.
For example, if you move 6 inches to the right one year, you’ll have an 18-inch gap (12-inch row spacing plus 6-inch side shift) on one side, and coming back a 6-inch gap (12-inch row sapcing less 6-inch side shift) on the next pass. Eighteen inches is a lot of wasted room and forces you in to a situation where you have to remove an opener from one side drill and place it on the other side to inter-row seed properly the next year. With 2-inch openers on 12-inch spacing, we chose to move 3 inches on each side, leaving us a 15-inch gap and a 9-inch gap between rows which is reasonable. The photo you see here shows the pin placement in year 1 (Y1), year 2 (Y2) and year 3 (Y3).
From my experience, when it comes to determining what opener width and row spacing you need, it all comes down to seedbed utilization. To determine your own seedbed utilization you simply divide your opener width by your row spacing and mutiply by 100.
For example: 2.5 inch opener ÷ 10 inch spacing × 100 = 25% SBU
Having a 25% SBU or less allows you to travel between the stubble for up to three years, allowing ample time for the residue on year one to break down by year four when you’ll be seeding over that row.
Inter-row seeding allows us to to travel through some really heavy residue and taller stubble than we could normally. The consistency in soil temperature is greater between the rows and warmer giving us better and faster emergence compared to a random traffic system. Our seeding depth is more consistent as well because soil flow is more even between the rows versus across the rows where root balls and residue alter flow and temperature. We can travel faster when seeding inter-row because the stubble acts like a barrier to prevent the back rows from throwing soil on top of the front rows. Anyway you look at it, inter-row seeding should be a part of your long-term plan and from what I’ve shown here, you should have a good start on the mechanics of it. SL
Pictured above: Offest hitch and shanks following inter-row in our CTF system.
A nitrogen side dress toolbar for JD sprayers
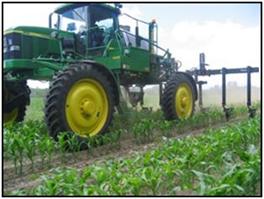 A subscriber from Ontario commented on the Hagie NTB side dressing toolbar article a couple of weeks ago and informed me that Yetter makes a bolt on nitrogen toolbar for John Deere sprayers. Great tip! So, I did some research and talked to the folks at Yetter to find out more about their side dress toolbar.
Here are the details:
• Designed for the JD 4710,4720, 4730, 4830 sprayer with 90-foot boom
• Allows for a one person changeover from spray boom to fertilizer toolbar with unique quick hitch system. Change over takes approximately 45 minutes.
• Constructed of 7-inch x 7-inch structural steel tubing and utilizes heavy-duty hinges to hydraulically fold for narrow transport width
• Must buy quick attach parts from John Deere seperately at a cost of about $3,500
• A 15 row 20-inch spacing toolbar costs $18,000
• A 12 row 30-inch spacing toolbar costs $16,900
Let’s look at the economics of owning the Yetter Nitrogen Side Dress toolbar with a 15 row, 20-inch row spacing toolbar. Let’s budget $22,500 for the system and assume 28-0-0 UAN is $0.62/lb with a side dress nitrogen application rate of 40 lbs/N/ac.
Steve’s quick math
40 lbs/N/ac as 28-0-0 × $0.62 lb = $24.00/ac
25% N loss from tie up and volatilization
Yetter nitrogen toolbar: $22,500
25% efficiency gain × $24.00/ac = $6.00/ac
In this example, if we could gain a 25% increase in nitrogen uptake efficiency from side dressing nitrogen with the Yetter toolbar versus dribble banding, we could generate a return on investment within one year on a 3,750 acre farm. The unfortunate part is the width of the toolbar at 25 feet; perhaps they could engineer a 60-foot toolbar like the Hagie NTB. The return on investment is based on nitrogen saving alone and not yield, protein gains or reduction in lodging from the proper rate and timing of side dressed nitrogen.
I have a pdf manual of the parts numbers and components needed from John Deere to mount the Yetter toolbar. I can email it to you if you like. If you have any questions, email the Yetter representative, Jeff Wherley, at jwherley@YetterCo.com
Thanks to Ed Hanson from Ontario for giving me the heads up on this system. SL
Photo source: Yetter Manufacturing:
Diving into VR with the Ag Leader OptRx sensor system
New equipment on our farm for 2012
I am really excited about a recent decision Mitch and I have made to buy an OptRx sensor system from Ag Leader on to our yet-to-be-purchased self-propelled sprayer to begin a variable rate nitrogen program. My approach to variable rate fertilizer will be simple when it comes to nitrogen application on our farm. I want to match the right nitrogen rate at the right growth stage so I’m not pushing areas too hard with nitrogen at seeding and also not missing the opportunity to increase nitrogen in-season when growing conditions are favourable. As a bonus we can use the OptRx to apply variable rate fungicide, growth regulators and desiccants on the go without purchasing NDVI imagery or building prescription maps.
How does the OptRx work? In a nutshell this is how:
1. OptRx sensors shine light on the crop.
2. Sensors then use reflected light off of the crop canopy to determine the vigor of the crop or Vegetative Index (VI).
3. One return trip across the field is required to establish a VI Reference Value.
4. Sensors obtain readings of crop conditions in a field and compare high crop vigor plants to the rest of the field.
5. Nitrogen rate is determined by comparing plants being scanned to VI Reference Value.
6. Sensor prescribed N rates come from historical records of N rate/yield trials and sensor scans.
This YouTube video is a good overview by my Ag Leader rep Stuart Lawrence from Rosetown, SK.
Agleader identifies three top benefits of OptRx over Greenseeker:
• OptRx uses 3 bands of red light versus 1 band of red light with Greenseeker technology which allows you to be more accurate with N applications on different crops at later growth stages.
• OptRx does not require an N rich strip like Greenseeker, so you don’t have to over apply nitrogen on one pass to calibrate the sensors.
• OptRx light sensing technology allows you to travel day or night unlike Greenseeker which only works well during daylight hours.
So, as for the dollars, these are the costs for an OptRx system on a 60-foot SprayCoupe:
Display kit, Integra: $4,500
OptRx master module kit: $1,500
OptRx sensor kit, 5 sensors: $15,000
Display cable kit, Can A/B, Ethernet with 15ft power cable: $300
Cable, OptRx sensor extension (25ft): $45
Cable, OptRx to SMS mobile (10ft): $45
Sprayer kit, Direct Command (SprayCoupe 3x40/4x50): $2,300
Grand Total: $23,695
My ultimate goal is to set up an OptRx on a nitrogen side dress toolbar because that is where I see us generating the fastest return on investment. I’m not really excited about streamer banding liquid nitrogen in season but for 2012, we’ll set it up on the high clearance sprayer with the intension of building a side dress nitrogen toolbar over the next 12 months.
We also intend to play with variable rate fungicides in canola, growth regulators in wheat and barley and desiccants like Reglone on peas. I see the ROI with this technology happening quickly on variable rate fungicides in canola when you factor in the estimated $2.50 to $5.00 an acre savings on fungicide and the reduction in consulting costs which can vary between $3.00 and $5.00 an acre. Saving between $5.00 and $10.00 an acre in canola would pay for an OptRx fairly quick. I’m eager to take the plunge. SL
Market News
Technicals
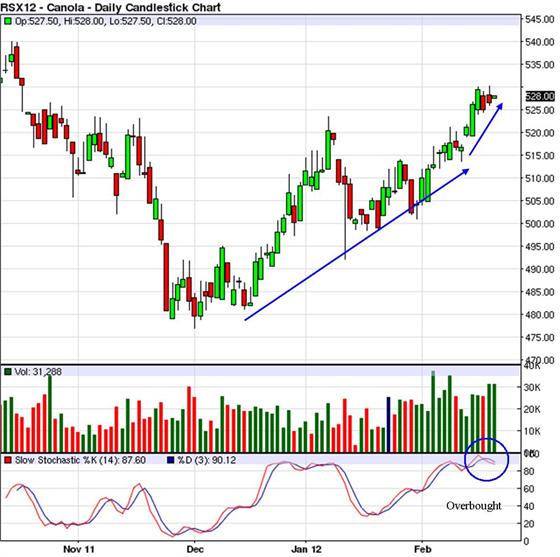
Canola Nov12: The long and short term trends are up.
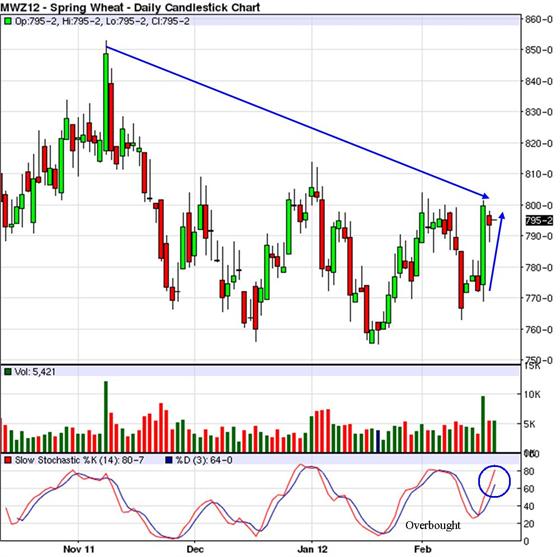
Wheat Dec12: The long term trend is down and the short term trend is up.
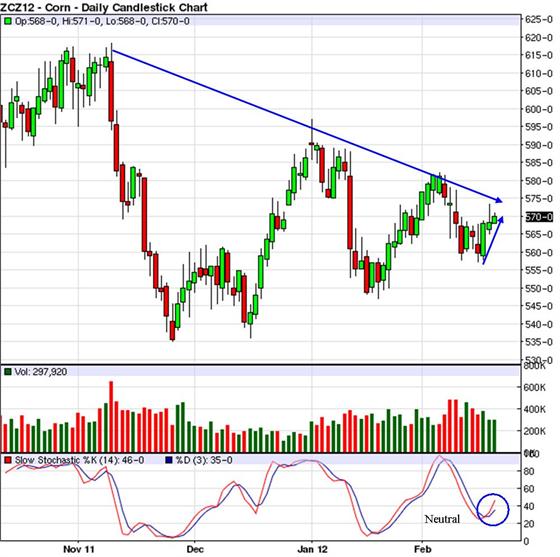
Corn Dec 12: The long term trend is down and the short term trend is up.
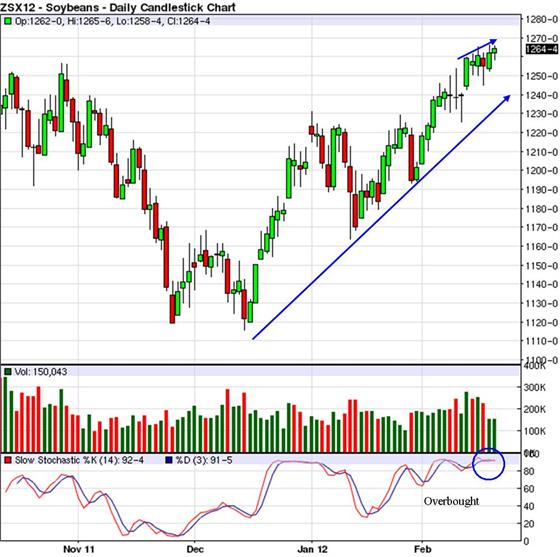
Soybeans Nov12: The long and short term trends are up.
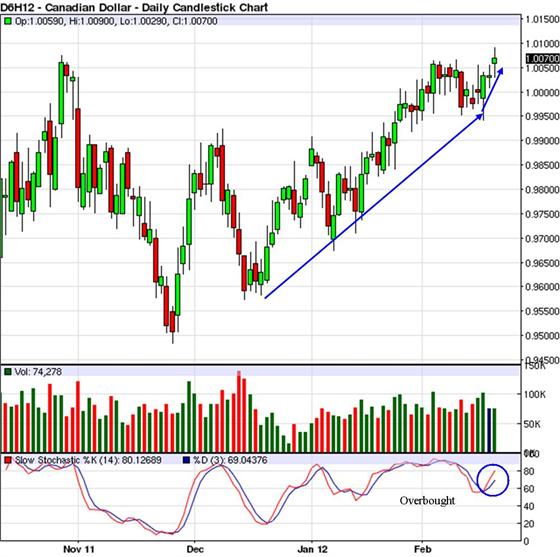
CDN$ Feb12: The long and short term trends are up.
USD Feb12: The long and short term trend is up.


