Agronomist notes
Hello Reader,
I’m writing this week’s newsletter from mild and humid Houston, Texas. I was invited here to speak on high yield malt barley production at the annual Stoller USA conference. I’ve had a really good conversation about growth regulators, fungicides and crop nutrition and that was within six hours of arriving! I expect more great conversations and epiphanies to come over the next couple of days.
This issue of Beyond Agronomy News will be short and sweet. We’ll look at why inter-row seeding in 2012 may not be the best option. Say what? Read on carefully. Next, I’ll run the numbers on a two-pass strip till system including a vacuum planter in canola production. Last, I’ll provide some tips on how to maximize foliar nutrient absorption and finish with some interesting tips on fungicides. We’ll finish with technical grain market news.
Have a great week.

Inter-row seeding is not the best option in dry conditions
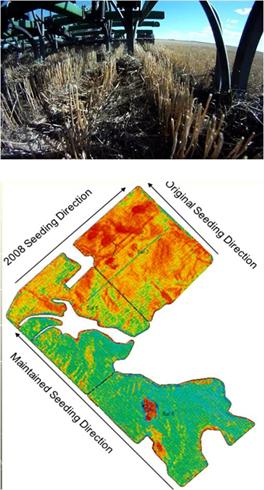 Aim for the rows, not between them.
You might have noticed that I talk a lot about inter-row seeding and the benefits of seeding between the rows, such as better residue flow, stubble walls blocking soil throw, warmer soils, more even soil flow, better depth control, etc. However, there is a case to be made for seeding on or beside the row that I should share with you.
While I was over in Western Australia visiting precision ag specialist Quenten Knight, he explained that his clients aim to seed on or beside the row at seeding. In their dry, non-wetting sandy soils, the space between the rows gets very hot and dry and can lead to poor germination. The soil right next to and underneath the stubble row will actually hold more moisture than between the rows and placing seed there will improve germination.
To prove his point Quenten showed me a 1m resolution NDVI photo that showed the difference in emergence on a crop seeded across the rows versus right beside the rows. You can see in the image the area seeded beside the rows is a blue-green colour indicating better germination compared to the red-orange area at the upper portion of the field where it was seeded across the rows.
Switch gears to Standard, AB in the fall of 2011 and I tried my own experiment with some very dry, heavy clay soil. Guess what I discovered. When I pulled out the stubble I found a nice moist root ball. In between the stubble rows was a rock hard, dry soil layer that I could barely stick a probe into. The soil conditions were so hard and baked that we couldn’t apply NH3. I thought about the possibility of RTK guidance on the NH3 applicator with disk openers. Then we could have banded right into the moist stubble rows and kept the stubble intact.
For those of you who are set up to inter-row seed, you may want to test the theory by aiming closer to the row if it’s dry this spring. Those with disk drills may be at an advantage as disks will roll through the stubble and not drag up clumps like a shank would. If you find little soil moisture this spring, perhaps you too can test the Aussie theory and aim to maximize germination. SL
Photo source: S. Larocque, Image source: Q. Knight
A two-pass vacuum planter and strip till canola system
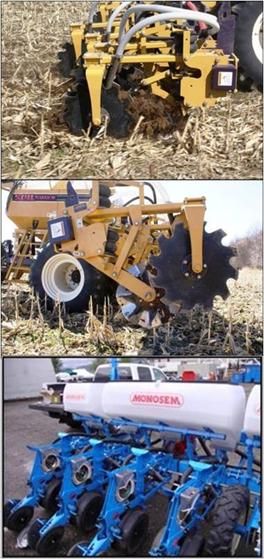 Upping the anty on canola production
Today’s one pass, direct seeding canola system leaves a lot to be desired, in my opinion. We’re comfortable with the yields and expenses because the margins in canola are really good. Eventually, however, margins will shrink and we’ll be no further ahead in our production capacity. I’ve been looking at vacuum planters to plant canola in a two-pass system that includes strip till. My goal is to improve canola seed placement, decrease seedling mortality to a reasonable 10%, reduce seed costs and find efficiency during planting.
My research has led me towards a Monosem planter, the type that is used by 99% of canola seed companies, as well as an ETS Soil Warrior Strip Till machine. The combination of the two would improve acres per fill at seeding to 340 ac/fill at 2.2 lbs/ac. In the fall I would use the ETS strip till machine on 24-inch rows to apply N-P-K-S deep banded down to six inches.
The Soil Warrior shown here in the Beyond Agronomy News gallery uses a system of two cutting disks with one wavy coulter to produce an eight inch band of blackened soil mixed with deep banded fertilizer. I think the wavy coulter in Western Canada will work better in wet, clay soils or drier soils because it cuts a furrow, it doesn’t rip or pull through a furrow like a shank. In fact, many from Eastern Ontario and the Northern US cornbelt prefer the wavy coulter over a deep shank because they can run in so many different soil conditions.
The cost of a 30-foot wide, 24-inch row Monosem planter runs $130,000 brand new. For testing purposes you could pick up a 30-foot, 20-inch row John Deere corn planter and fiddle around with it for under $20,000. The ETS Soil Warrior unit including the strip till row units, the 30-foot toolbar, with hitch, air bags, 230 bu/ac tank and row cleaners comes to $151,000.
Steve’s quick math
JD 57-foot 1830 on 12-inch spacing with JD 1910 430 bu tank: $250,000
ETS Soil Warrior on 24-inch rows with 230 bu frame mounted tank: $151,000
Monosem 30-foot planter with 24-inch rows: $130,000
Seed savings: $9.40 lb × 5 lbs/ac - $9.40 × 2 lbs/ac = $28.20/ac
In this example you would need to plant 3,300 acres of canola to generate an ROI within three years when you factor in seed cost savings. You’d need a high HP tractor to pull the Soil Warrior, roughly 20 HP per row (300 HP in this example).
I like the use of strip till systems to improve nutrient placement by deep banding N-P-K-S, which provides plant nutrition at root depth. Also, the blackened strip till band reduces frost risk in the spring and improves emergence through warmer soils. Adding in the Monosem vacuum planter which offers seed singulation and highly accurate seed placement, you could easily gain a 30 or 40% increase in seedling establishment.
So now you know what’s on my wish list! I could probably start with a JD planter for under $20,000 and buy Soil Warrior row units to bolt on to the old Frigstad air seeder that has a 190 bu frame mounted tank for $28,000. Then we’d be $50,000 all in which is a little more reasonable than $281,000. This is an aspect of canola production I’m game to implement. SL
For more information on both units visit Monosem Planter and ETS Soil Warrior online.
Photo source: (top, middle) soilwarrior.com, (bottom) S. Larocque
Optimizing foliar nutrient uptake
We’ve been discussing the use of foliar urea lately. A lot has yet to be learned about the proper use of foliar nutrient programs with respect to plant uptake. In this article I'll provide a number of tips to help you generate a better return on your foliar nutrient program just by understanding how the nutrients work and how to increase their efficiency.
Tips and facts on foliar nutrient uptake
- Increasing the amount of time a leaf has to absorb foliar applied micronutrients before drying occurs is paramount to maximum absorption or nutrient uptake. Nutrients are only absorbed while the spray is wet on the leaf!
- Foliar micronutrient applications should be applied in early morning or late evening when humidity or dew levels are high to increase the length of leaf wetness and absorption potential.
- How many people apply foliar micronutrients at herbicide timing and spray in the middle of the day? Stop! You're wasting your money if humidity levels are low and windy conditions are drying leaf surfaces quickly. If there is no rain in sight, save the herbicide/micronutrient applications until evening.
- The application timing of macronutrients like nitrogen, phosphorus and potassium are opposite to micronutrients. Apply macros during the warmer, drier part of the day when leaves dry quicker to avoid leaf burn or phytotoxicity.
- Macronutrients like N,P,K,S and Ca should only be a minor supplement to your soil fertility program. Leaves simply cannot absorb enough macronutrients to sustain optimum plant yield.
- Substantial research indicates that adding urea or potassium nitrate to liquid spray solutions improves the foliar absorption of micronutrients.
- Try to reach both the upper and lower leaf surfaces with spray solution where possible through higher water volumes or dual spray nozzles.
- Use only chelated micronutrients. The chelation process forms an inorganic coating around the micronutrient which allows the nutrient to penetrate the waxy leaf surface. Once in the leaf, the chelate releases the nutrient so that it can be used by the plant.
- Remember, stomata must be open to allow nutrients to enter the plant. Stresses like drought, high temperatures, and frost prematurely close stomata and nutrient entry points.
- Try to maintain a spray solution pH below 6. The lower the pH of the spray solution, the faster uptake through the leaf.
There are a number of foliar micronutrient products on the market like Nexus, Stoller, Omex, UAP, Phosyn and NutriAg to name a few. Foliar nutrient programs do have a fit in our production systems; just be sure to do everything you can to sure ensure optimum uptake by following the simple tips. If you don't, you're only throwing money on the ground. SL
Fungicide and growth regulator tips
A little conversation, a lot of ideas
I bumped into a research colleague on my way to Houston and we started talking about growth regulators and fungicides. He had some great tips and ideas. These are my rough notes from the conversation:
- Using Prosaro instead of Proline worked out a bit cheaper with programming and has the same rate of active ingredient with prothiaconazole. Plus you get the benefit of tebuconazole.
- A half rate of Caramba at the start of bolting acts as a growth regulator and gives exceptional protection against blackleg.
- Plant growth regulators with Chlormoquat like Manipulator or Cycocel Extra give more flexibility at application timing.
- Caramba at two-thirds rate on oats at flag leaf gives exceptional leaf disease protection.
- Twinline (Headline + Caramba mix) is a possible paring with chlormoquat at GS30-31.
Market News
Technicals
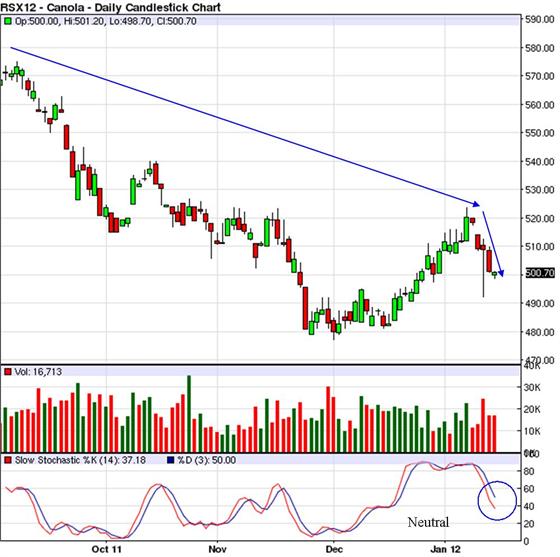
Canola: Nov12: The long and short term trend is down.
Wheat: Dec12: The long and short term trend is down.
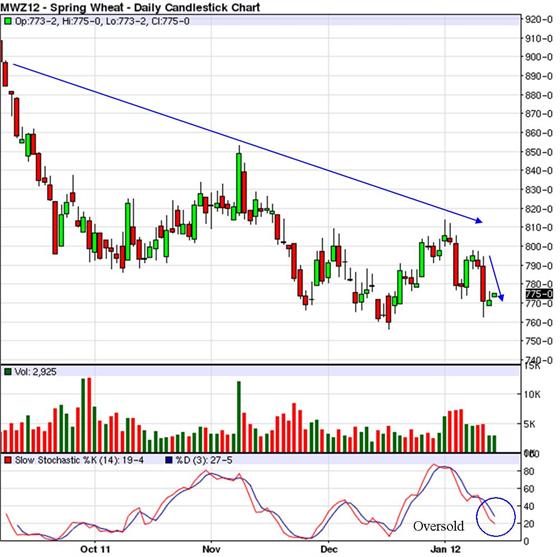
Corn: Dec12: The long and short term trend is down.
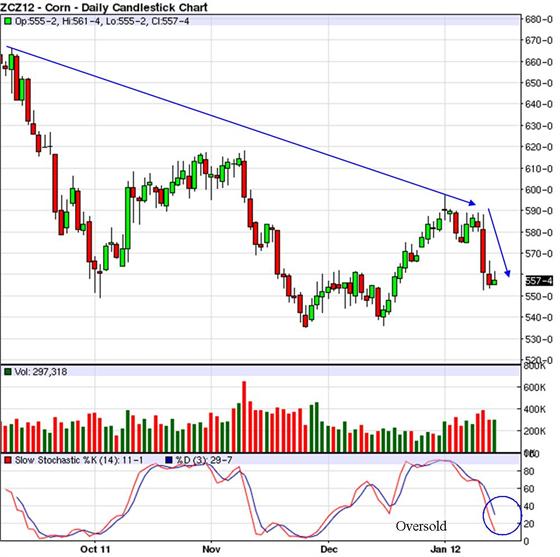
Soybeans: Nov12: The long and short term trends are down.
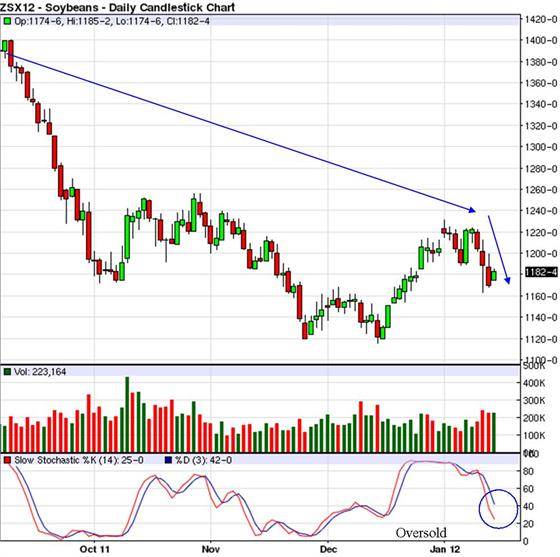
Canadian Dollar: Mar12: The long term trend is down and the short term trend is up..
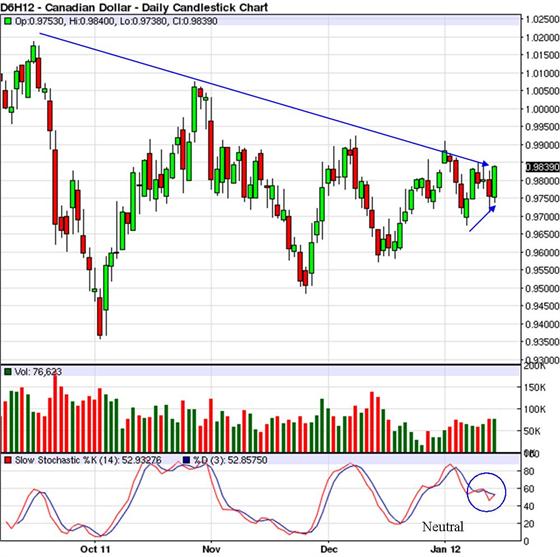
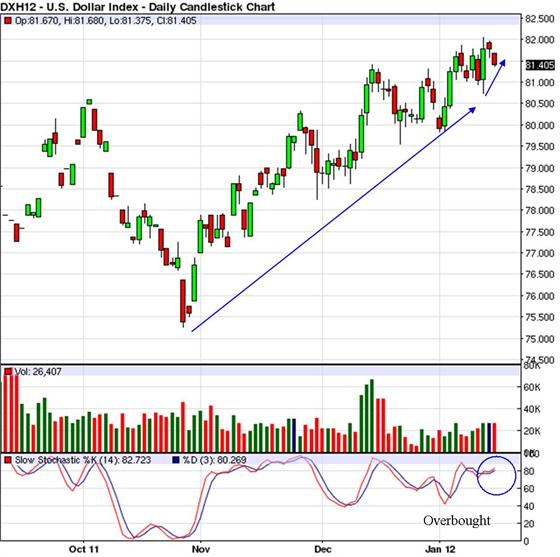
USD: Mar12: The long and short term trends are up.
